Renovating a 100 Year Old Farmhouse.
- Olivia Cernek
- Nov 4, 2020
- 6 min read
Updated: Jul 12, 2024

Welcome to our home!
This photo is from July 2019. It was the first summer that was spent in this house after 2 years renovating. The property was purchased in June 2017 but didn't move in until March of 2019.
Here’s a photo of what our house looked like when we first bought it before anything had been started. This was just the beginning of a long renovation process.

The photo speaks for itself...
The house had not been taken care of for YEARS and was vacant for a few years before we bought it. By looking at this picture you might think that we were crazy for taking on a project like this, and we probably were! But I have a soft spot for making things new again and giving things purpose. I've always enjoyed older houses and things that came before us, than opposed to new construction.
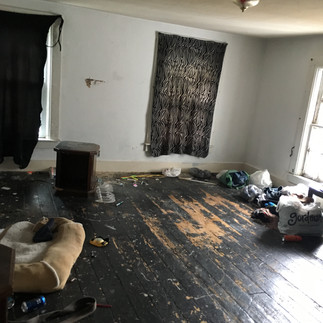
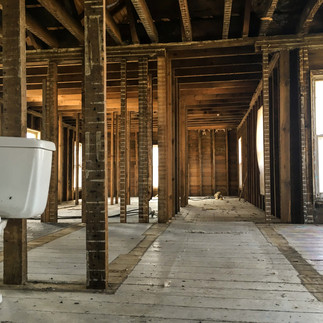
It's hard to know where to start with a project of this scale and with so many variables, so we started by clearing out random stuff that had been left in the house. Here are some photos from the first time we were inside our house.


Obviously the house needed work. Could we have just replaced flooring, windows, and done the bare minimum? Yes.
But if we were going to make this our home we were going to do it the right way.
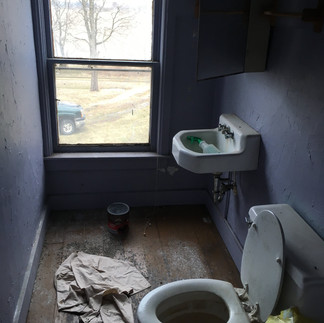
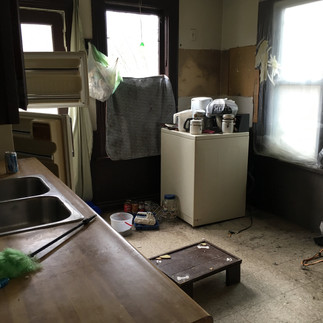
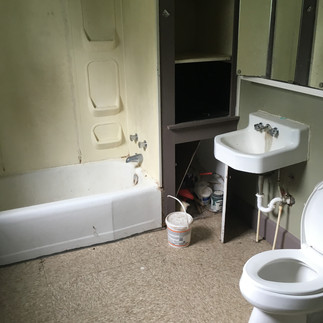
Here's photos of what our house and land looked like before...


The exterior of the house made it look worse than it actually was. The old windows, roof, and fallen off siding made the house look rough. I have to admit I love how many windows there are because I love natural light, and thankfully after renovations most of the windows are in the original places.
Here are a few more photos of the house once stuff had been cleared, and just before we started gutting everything.


The garage was filled with trash bags as if it was a dumpster. The old barn structure is also filled with garbage... The barn burnt in a fire years ago, but the previous owners decided to fill it with trash and random objects that have been sitting there for far too long. Last spring I attempted to clear out as much trash as possible but it was not successful.
DEMO
After we got all the random stuff out of the house and cleared debris around the house, the real project began. If we wanted to, we could have just replaced the entire kitchen, bathrooms, flooring, and made other adjustments to make the house livable. But there was a large sag in the floor due to an old beam that would need to be replaced, and we later discovered that part of our basement would need major work. We decided that if this was going to be our home we were going to fix it up the right way. We gutted the house down to the studs, got rid of the old and put in the new. If we were going to put money and time into this house we were going to start from scratch and make it worth our while.
The first stages of demo were terribly messy... if you have ever dealt with old plaster and lath then you know exactly what I'm talking about. I distinctly remember my Christmas break of 2017 because weekends were spent working on the house from sun up to sun down. We spent all day clearing out the old lath, plaster, and insulation, and not to mention it was the middle of winter so all we had to heat the house was a kerosene heater. Our entire bodies were a shade of gray from being coated in dust and insulation. I don't have many pictures from this time because we never brought our phones inside due to how messy we got.
Here's a few pictures while we were removing walls and insulation.


Just to clear the house of the old mess and gutting took about a year.
AFTER THE MESS
Once the mess was taken out of the house it was time to start figuring out how to make this house into a home.
How do we want the layout? Keep the original or change it?
What will our rooms look like?
Here's some transformation photos of the house after we finished gutting it. Nothing but walls and studs.


THE DOWNSTAIRS
What we did:
- All new windows for the entire house.
- Moved the stairs to the other side of the house. The stairs are now wide and have a landing, and aren't nearly as steep as the original ones!
- Got rid of two outside doors, and moved the front door to the other half of the house.
- Created a bigger kitchen/dining area where the original living room and laundry room were.
- Replaced the full bath with a half bath.
- Moved the basements door and stairs.
- Added a laundry room and dog area.
- Doubled our front porch.
- Added a back porch with sliding doors. (the porch isn't finished, but it's started!)
- We have a basement that's completely usable. It isn't finished, but it's mainly storage, and later we plan to add two more rooms.
Our downstairs got a huge makeover. We replaced a sagging beam in the basement and part of the entryway floor.
THE UPSTAIRS
Where to start... the ceilings use to be so low that I could touch them by just reaching up. There use to be five small bedrooms, a couple closets, a half bath, and a walk up attic. We loved the walk up attic! It was pretty large and would have been such a cool feature to the house, but we couldn't deal with how low the ceilings were.
So here's what we did:
- Raised the ceilings to 8' high, which unfortunately means we lost our attic space.
- Created two large sized bedrooms both with closets.
- Add a master bedroom with a master bathroom and walk-in closet.
- Added a full bath.
- And the best room of house... an ART STUDIO for me!!!
I love the art studio because the room structure wasn't changed at all, and while it's a small room, it's the first space of my own that I've ever had.
After the walls were put back in it was time to hire out contractors for electrical, heating and cooling, plumbing, and drywalling. This is where the tough decisions came.
We put tile in the laundry room, entryway, and upstairs bathrooms and I'm SO glad we did. It makes cleaning so much easier. We put engineered hardwood in the bathroom, kitchen, dining area, upstairs hallway, and our master bedroom. Hardwood would have been our first choice but is very pricy so we did some research and found that as a great alternative. The engineered hardwood doesn't scratch as easily as hardwood, and is still a massive step up from laminate flooring.
The kitchen got a beautiful copper, farmhouse sink that I absolutely love. Our kitchen cabinets are a beautiful stained oak that really give that classic farmhouse look. We spent a little bit more for quartz countertops and I'm really glad we did. They're so much more durable than laminate, can withstand high heat temps, you can cut directly on them (I don't but it's always an option), and they are so much easier to clean. We found stainless steel appliances. I drew up our kitchen island design and had it built.
Here's some photos of what the house began to look like as we progressed.
New walls and stairs were being built.
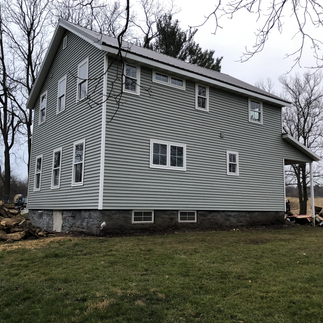
The house had new windows and was close to being sided.
Our front porch was added.


Got drywall up and some siding too. Walls painted. Cabinets in.


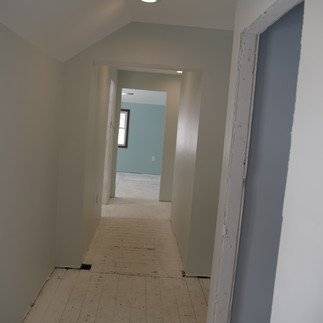


A few more "finished" photos of the house. Floors were laid.
Vanities started to go in.
The sliding barn door for the master bedroom.
Porch lights finally on.


I've been asked a lot about our house's transformation, and I would do it again in a heartbeat. There is something so gratifying about making something your home, and it was truly amazing taking an old house and making it new again.
- Livi


Contractors:
Pence Construction - Monticello, WI Clark Electric - New Glarus, WI Zettle Heating and Cooling - Brodhead, WI Scott Bredeson, Plumbing - Darlington, WI Weckerly Drywall, Drywall - Monroe, WI Hilliard Construction - Monroe, WI Zersen's Flooring - Monroe, WI Dylan Bigler, Siding - Dayton, WI Brother's Main, Appliances - Madison, WI Lowe's, Vanities - Dubuque, IA Menards (SO MUCH STUFF...)
Published: April 2020
It's beautiful Olivia and Brent! I'm so impressed with how much work you have done! Sincerely, Holly😀